Running Experiments#
Run an experiment#
Launch Autosubmit with the command:
# Add your key to ssh agent ( if encrypted )
ssh-add ~/.ssh/id_rsa
autosubmit run <EXPID>
In the previous command output <EXPID> is the experiment identifier. The command
exits with 0 when the workflow finishes with no failed jobs, and with 1
otherwise.
Options:
$ autosubmit run -h

Output:
usage: autosubmit run [-h] [-nt] [-v] [-st START_TIME] [-sa START_AFTER]
                      [-rom RUN_ONLY_MEMBERS] [-p [MAX_ITER]] [-t]
                      expid

runs specified experiment

positional arguments:
  expid                 experiment identifier

optional arguments:
  -h, --help            show this help message and exit
  -nt, --notransitive   Disable transitive reduction
  -v, --update_version  Update experiment version
  -st START_TIME, --start_time START_TIME
                        Sets the starting time for this experiment
  -sa START_AFTER, --start_after START_AFTER
                        Sets a experiment expid which completion will trigger
                        the start of this experiment.
  -rom RUN_ONLY_MEMBERS, --run_only_members RUN_ONLY_MEMBERS
                        Sets members allowed on this run.
  -p [MAX_ITER], --profile [MAX_ITER]
                        Enables profiling. Optionally pass the maximum number
                        of iterations (0 = no cap).
  -t, --trace           Enables trace output for profiling (requires
                        --profile).
Example:
Important
If the autosubmit version is set in autosubmit_<EXPID>.yml, it must match the actual autosubmit version.
Hint
It is recommended to launch it in background and with nohup (continue running although the user who launched the process logs out).
# Add your key to ssh agent ( if encrypted )
ssh-add ~/.ssh/id_rsa
nohup autosubmit run <EXPID> &
Important
Before launching Autosubmit, check that password-less ssh is feasible (HPCName is the hostname).
Important
Add encryption key to ssh agent for each session (if your ssh key is encrypted).
Important
The host machine has to be able to access HPC’s/Clusters via password-less ssh. Make sure that the ssh key is in PEM format ssh-keygen -t rsa -b 4096 -C “email@email.com” -m PEM.
ssh HPCName
More info on password-less ssh can be found at: http://www.linuxproblem.org/art_9.html
Caution
After launching Autosubmit, one must be aware of login expiry limit and policy (if applicable for any HPC) and renew the login access accordingly (by using token/key etc) before expiry.
When running operational experiments (i.e. an experiment whose EXPID starts with 'o', e.g. o001),
and that have a Git project, Autosubmit checks if there is any code that was not committed
or not pushed to the remote Git repository.
If there are local changes not committed and pushed, Autosubmit will fail to run the experiment, print an error message, and exit with an exit code different than zero.
This can be disabled by setting the property CONFIG.GIT_OPERATIONAL_CHECK_ENABLED
to False (it is True by default). Note, however, that this is discouraged as
it would affect the traceability of operational experiments.
How to run an experiment that was created with another version#
Important
First of all you have to stop your Autosubmit instance related with the experiment
Once you’ve already loaded / installed the Autosubmit version do you want:
autosubmit create <EXPID>
autosubmit recovery <EXPID> -s --all -f
# Add your key to ssh agent ( if encrypted )
ssh-add ~/.ssh/id_rsa
autosubmit run <EXPID> -v
or
autosubmit updateversion <EXPID>
# Add your key to ssh agent ( if encrypted )
ssh-add ~/.ssh/id_rsa
autosubmit run <EXPID> -v
EXPID is the experiment identifier. The most common problem when you change your Autosubmit version is the apparition of several Python errors. This is due to how Autosubmit saves internally the data, which can be incompatible between versions. The steps above represent the process to re-create (1) these internal data structures and to recover (2) the previous status of your experiment.
How to run an experiment that was created with version <= 4.0.0#
Important
First of all you have to stop your Autosubmit instance related with the experiment.
Once you’ve already loaded / installed the Autosubmit version do you want:
autosubmit upgrade <EXPID>
autosubmit create <EXPID>
autosubmit recovery <EXPID> -s --all -f
# Add your key to ssh agent ( if encrypted )
ssh-add ~/.ssh/id_rsa
autosubmit run <EXPID> -v
or
autosubmit updateversion <EXPID>
# Add your key to ssh agent ( if encrypted )
ssh-add ~/.ssh/id_rsa
autosubmit run <EXPID> -v
<EXPID> is the experiment identifier. The most common problem when you upgrade an experiment with INI configuration to YAML is that some variables may be not automatically translated. Ensure that all your <EXPID>/conf/*.yml files are correct and also revise the templates in <EXPID>/proj/$proj_name.
How to run only selected members#
To run only a subset of selected members you can execute the command:
# Add your key to ssh agent ( if encrypted )
ssh-add ~/.ssh/id_rsa
autosubmit run <EXPID> -rom MEMBERS
<EXPID> is the experiment identifier, the experiment you want to run.
MEMBERS is the selected subset of members. Format “member1 member2 member2”, example: “fc0 fc1 fc2”.
Then, your experiment will start running jobs belonging to those members only. If the experiment was previously running and autosubmit was stopped when some jobs belonging to other members (not the ones from your input) where running, those jobs will be tracked and finished in the new exclusive run.
Furthermore, if you wish to run a sequence of only members execution, then instead of running autosubmit run -rom “member_1” … autosubmit run -rom “member_n”, you can make a bash file with that sequence and run the bash file. Example:
# Add your key to ssh agent ( if encrypted )
ssh-add ~/.ssh/id_rsa
autosubmit run <EXPID> -rom MEMBER_1
autosubmit run <EXPID> -rom MEMBER_2
autosubmit run <EXPID> -rom MEMBER_3
...
autosubmit run <EXPID> -rom MEMBER_N
How to start an experiment at a given time#
To start an experiment at a given time, use the command:
# Add your key to ssh agent ( if encrypted )
ssh-add ~/.ssh/id_rsa
autosubmit run <EXPID> -st INPUT
<EXPID> is the experiment identifier
- INPUT is the time when your experiment will start. You can provide two formats:
H:M:S: For example,15:30:00will start your experiment at 15:30 in the afternoon of the present day.yyyy-mm-dd H:M:S: For example,2021-02-15 15:30:00will start your experiment at 15:30 in the afternoon on February 15th.
Then, your terminal will show a countdown for your experiment start.
This functionality can be used together with other options supplied by the run command.
The -st command has a long version –start_time.
How to start an experiment after another experiment is finished#
To start an experiment after another experiment is finished, use the command:
# Add your key to ssh agent ( if encrypted )
ssh-add ~/.ssh/id_rsa
autosubmit run <EXPID> -sa <EXPIDB>
<EXPID> is the experiment identifier, the experiment you want to start.
<EXPIDB> is the experiment identifier of the experiment you are waiting for before your experiment starts.
Warning
Both experiments must be using Autosubmit version 3.13.0 or later.
Then, your terminal will show the current status of the experiment you are waiting for. The status format is COMPLETED/QUEUING/RUNNING/SUSPENDED/FAILED.
This functionality can be used together with other options supplied by the run command.
The -sa command has a long version –start_after.
How to profile Autosubmit while running an experiment#
Autosubmit offers the possibility to profile an experiment execution. To enable the profiler, just
add the --profile (or -p) flag to your autosubmit run command, as in the following example:
autosubmit run --profile <EXPID>
Note
Remember that the purpose of this profiler is to measure the performance of Autosubmit, not the jobs it runs.
This profiler uses Python’s cProfile and psutil modules to generate a report with simple CPU and
memory metrics which will be displayed in your console after the command finishes, as in the example below:
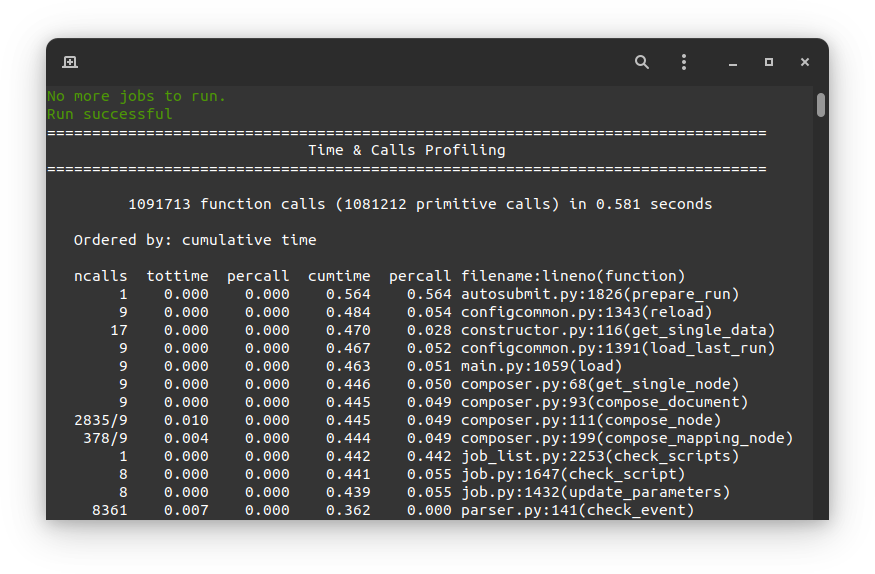
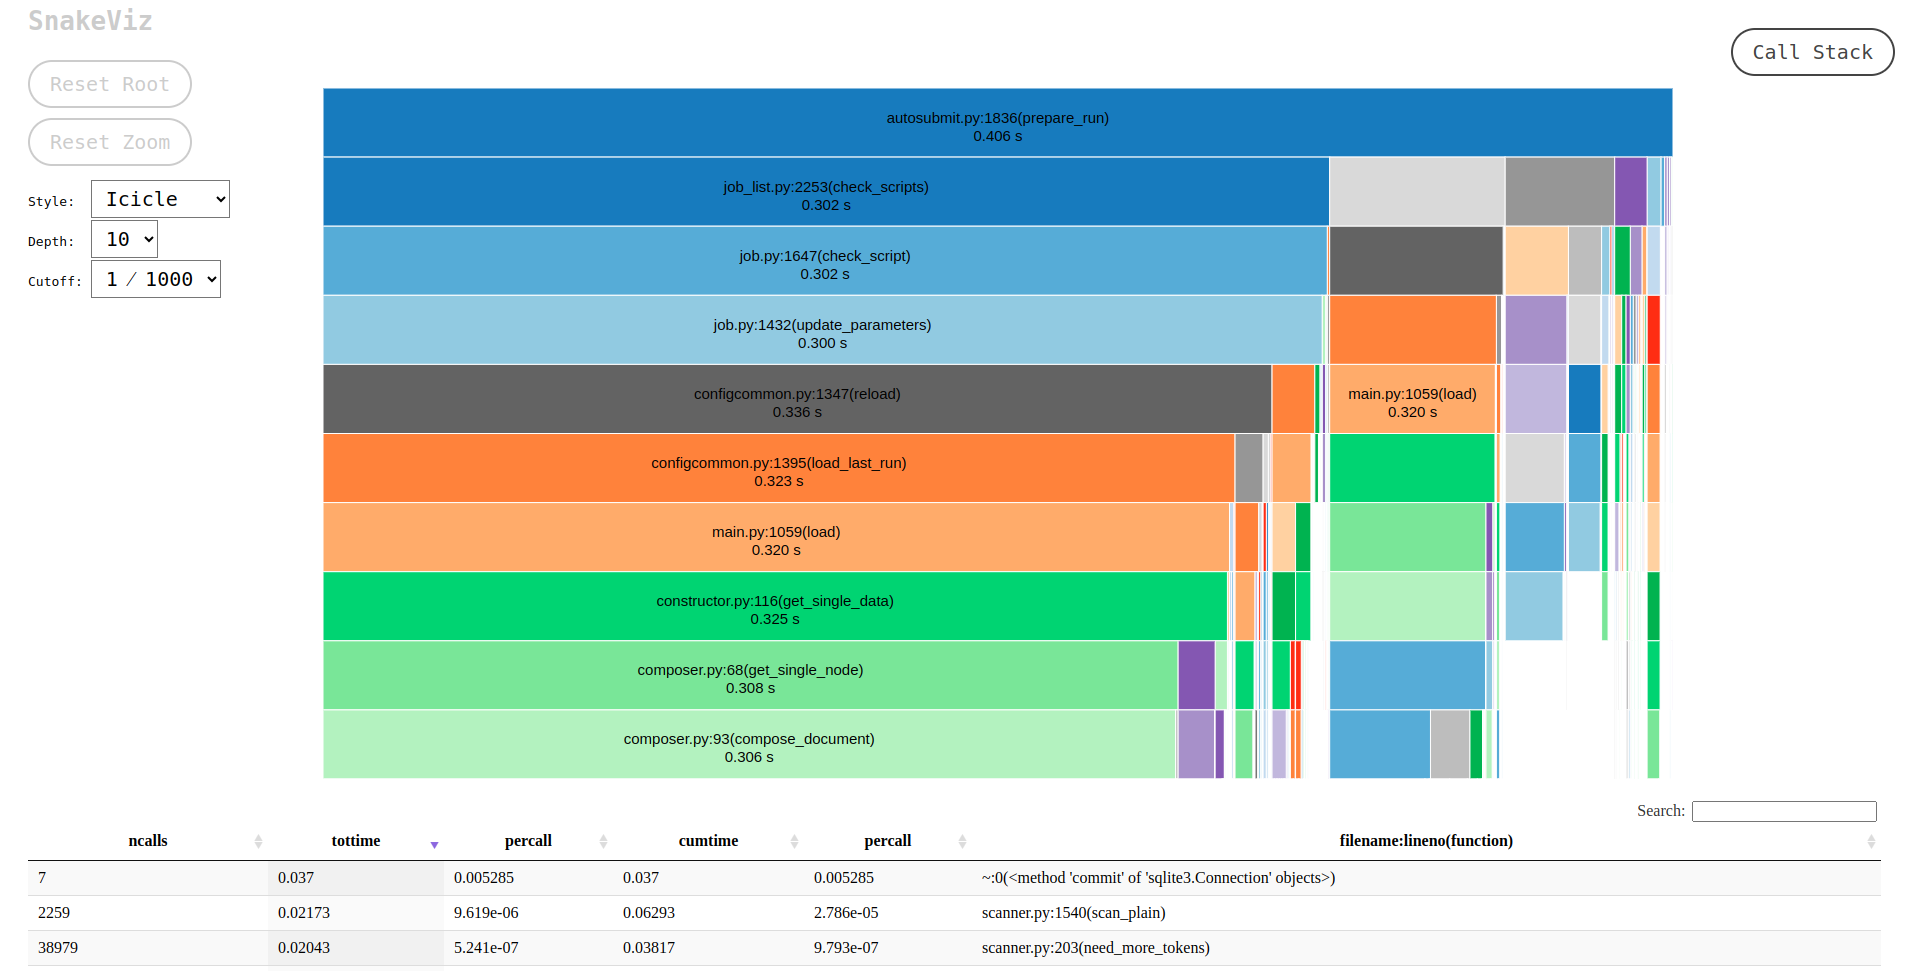
The profiler output is also saved in <EXPID>/tmp/profile. There you will find two files, the
report in plain text format and a .prof binary which contains the CPU metrics. We highly recommend
using SnakeViz to visualize this file, as follows:
For more detailed documentation about the profiler, please visit this page.
How to prepare an experiment to run in two independent job_list. (Priority jobs, Two-step-run) (OLD METHOD)#
This feature allows to run an experiment in two separated steps without the need of do anything manually.
To achieve this, you will have to use an special parameter called TWO_STEP_START in which you will put the list of the jobs that you want to run in an exclusive mode. These jobs will run until all of them finishes and once it finishes, the rest of the jobs will begun the execution.
It can be activated through TWO_STEP_START and it is set on expdef_<EXPID>.yml, under the experiment: section.
experiment:
DATELIST: 20120101 20120201
MEMBERS: fc00[0-3]
CHUNKSIZEUNIT: day
CHUNKSIZE: 1
NUMCHUNKS: 10
CHUNKINI :
CALENDAR: standard
# To run before the rest of experiment:
TWO_STEP_START: <job_names§ion,dates,member_or_chunk(M/C),chunk_or_member(C/M)>
In order to be easier to use, there are Three modes for use this feature: job_names and section,dates,member_or_chunk(M/C),chunk_or_member(C/M).
By using job_names alone, you will need to put all jobs names one by one divided by the char , .
By using section,dates,member_or_chunk(M/C),chunk_or_member(C/M). You will be able to select multiple jobs at once combining these filters.
Use both options, job_names and section,dates,member_or_chunk(M/C),chunk_or_member(C/M). You will have to put & between the two modes.
There are 5 fields on TWO_STEP_START, all of them are optional but there are certain limitations:
Job_name: [Independent] List of job names, separated by ‘,’ char. Optional, doesn’t depend on any field. Separated from the rest of fields by ‘&’ must be the first field if specified
Section: [Independent] List of sections, separated by ‘,’ char. Optional, can be used alone. Separated from the rest of fields by ‘;’
Dates: [Depends on section] List of dates, separated by ‘,’ char. Optional, but depends on Section field. Separated from the rest of fields by ‘;’
member_or_chunk: [Depends on Dates(OR)] List of chunk or member, must start with C or M to indicate the filter type. Jobs are selected by [1,2,3..] or by a range [0-9] Optional, but depends on Dates field. Separated from the rest of fields by ‘;’
chunk_or_member: [Depends on Dates(OR)] List of member or chunk, must start with M or C to indicate the filter type. Jobs are selected by [1,2,3..] or by a range [0-9] Optional, but depends on Dates field. Separated from the rest of fields by ‘;’
Example using the old method#
Guess the expdef configuration as follow:
experiment:
    DATELIST: 20120101
    MEMBERS: 00[0-1]
    CHUNKSIZEUNIT: day
    CHUNKSIZE: 1
    NUMCHUNKS: 2
    TWO_STEP_START: a02n_20120101_000_1_REDUCE&COMPILE_DA,SIM;20120101;c[1]
Given this job_list ( jobs_conf has REMOTE_COMPILE(once),DA,SIM,REDUCE)
[‘a02n_REMOTE_COMPILE’, ‘a02n_20120101_000_1_SIM’, ‘a02n_20120101_000_2_SIM’, ‘a02n_20120101_001_1_SIM’, ‘a02n_20120101_001_2_SIM’, ‘a02n_COMPILE_DA’, ‘a02n_20120101_1_DA’, ‘a02n_20120101_2_DA’, ‘a02n_20120101_000_1_REDUCE’, ‘a02n_20120101_000_2_REDUCE’, ‘a02n_20120101_001_1_REDUCE’, ‘a02n_20120101_001_2_REDUCE’]
The priority jobs will be ( check TWO_STEP_START from expdef conf):
[‘a02n_20120101_000_1_SIM’, ‘a02n_20120101_001_1_SIM’, ‘a02n_COMPILE_DA’, ‘a02n_20120101_000_1_REDUCE’]
How to prepare an experiment to run in two independent job_list. (New method)#
From AS4, TWO_STEP_START is not longer needed since the users can now specify exactly which tasks of a job are needed to run the current task in the DEPENDENCIES parameter.
Simplified example using the new method#
This example is based on the previous one, but using the new method and without the reduce job.
experiment:
    DATELIST: 20120101
    MEMBERS: "00[0-1]"
    CHUNKSIZEUNIT: day
    CHUNKSIZE: 1
    NUMCHUNKS: 2
JOBS:
    REMOTE_COMPILE:
        FILE: remote_compile.sh
        RUNNING: once
    DA:
        FILE: da.sh
        DEPENDENCIES:
            SIM:
            DA:
                DATES_FROM:
                 "20120201":
                   CHUNKS_FROM:
                    1:
                     DATES_TO: "20120101"
                     CHUNKS_TO: "1"
    SIM:
        FILE: sim.sh
        DEPENDENCIES:
            LOCAL_SEND_STATIC:
            REMOTE_COMPILE:
            SIM-1:
            DA-1:
Example 2: Crossdate wrappers using the the new dependencies#
experiment:
  DATELIST: 20120101 20120201
  MEMBERS: "000 001"
  CHUNKSIZEUNIT: day
  CHUNKSIZE: '1'
  NUMCHUNKS: '3'
wrappers:
    wrapper_simda:
        TYPE: "horizontal-vertical"
        JOBS_IN_WRAPPER: "SIM DA"

JOBS:
  LOCAL_SETUP:
    FILE: templates/local_setup.sh
    PLATFORM: marenostrum_archive
    RUNNING: once
    NOTIFY_ON: COMPLETED
  LOCAL_SEND_SOURCE:
    FILE: templates/01_local_send_source.sh
    PLATFORM: marenostrum_archive
    DEPENDENCIES: LOCAL_SETUP
    RUNNING: once
    NOTIFY_ON: FAILED
  LOCAL_SEND_STATIC:
    FILE: templates/01b_local_send_static.sh
    PLATFORM: marenostrum_archive
    DEPENDENCIES: LOCAL_SETUP
    RUNNING: once
    NOTIFY_ON: FAILED
  REMOTE_COMPILE:
    FILE: templates/02_compile.sh
    DEPENDENCIES: LOCAL_SEND_SOURCE
    RUNNING: once
    PROCESSORS: '4'
    WALLCLOCK: 00:50
    NOTIFY_ON: COMPLETED
  SIM:
    FILE: templates/05b_sim.sh
    DEPENDENCIES:
      LOCAL_SEND_STATIC:
      REMOTE_COMPILE:
      SIM-1:
      DA-1:
    RUNNING: chunk
    PROCESSORS: '68'
    WALLCLOCK: 00:12
    NOTIFY_ON: FAILED
  LOCAL_SEND_INITIAL_DA:
    FILE: templates/00b_local_send_initial_DA.sh
    PLATFORM: marenostrum_archive
    DEPENDENCIES: LOCAL_SETUP LOCAL_SEND_INITIAL_DA-1
    RUNNING: chunk
    SYNCHRONIZE: member
    DELAY: '0'
  COMPILE_DA:
    FILE: templates/02b_compile_da.sh
    DEPENDENCIES: LOCAL_SEND_SOURCE
    RUNNING: once
    WALLCLOCK: 00:20
    NOTIFY_ON: FAILED
  DA:
    FILE: templates/05c_da.sh
    DEPENDENCIES:
      SIM:
      LOCAL_SEND_INITIAL_DA:
        CHUNKS_TO: "all"
        DATES_TO: "all"
        MEMBERS_TO: "all"
      COMPILE_DA:
      DA:
        DATES_FROM:
         "20120201":
           CHUNKS_FROM:
            1:
             DATES_TO: "20120101"
             CHUNKS_TO: "1"
    RUNNING: chunk
    SYNCHRONIZE: member
    DELAY: '0'
    WALLCLOCK: 00:12
    PROCESSORS: '256'
    NOTIFY_ON: FAILED
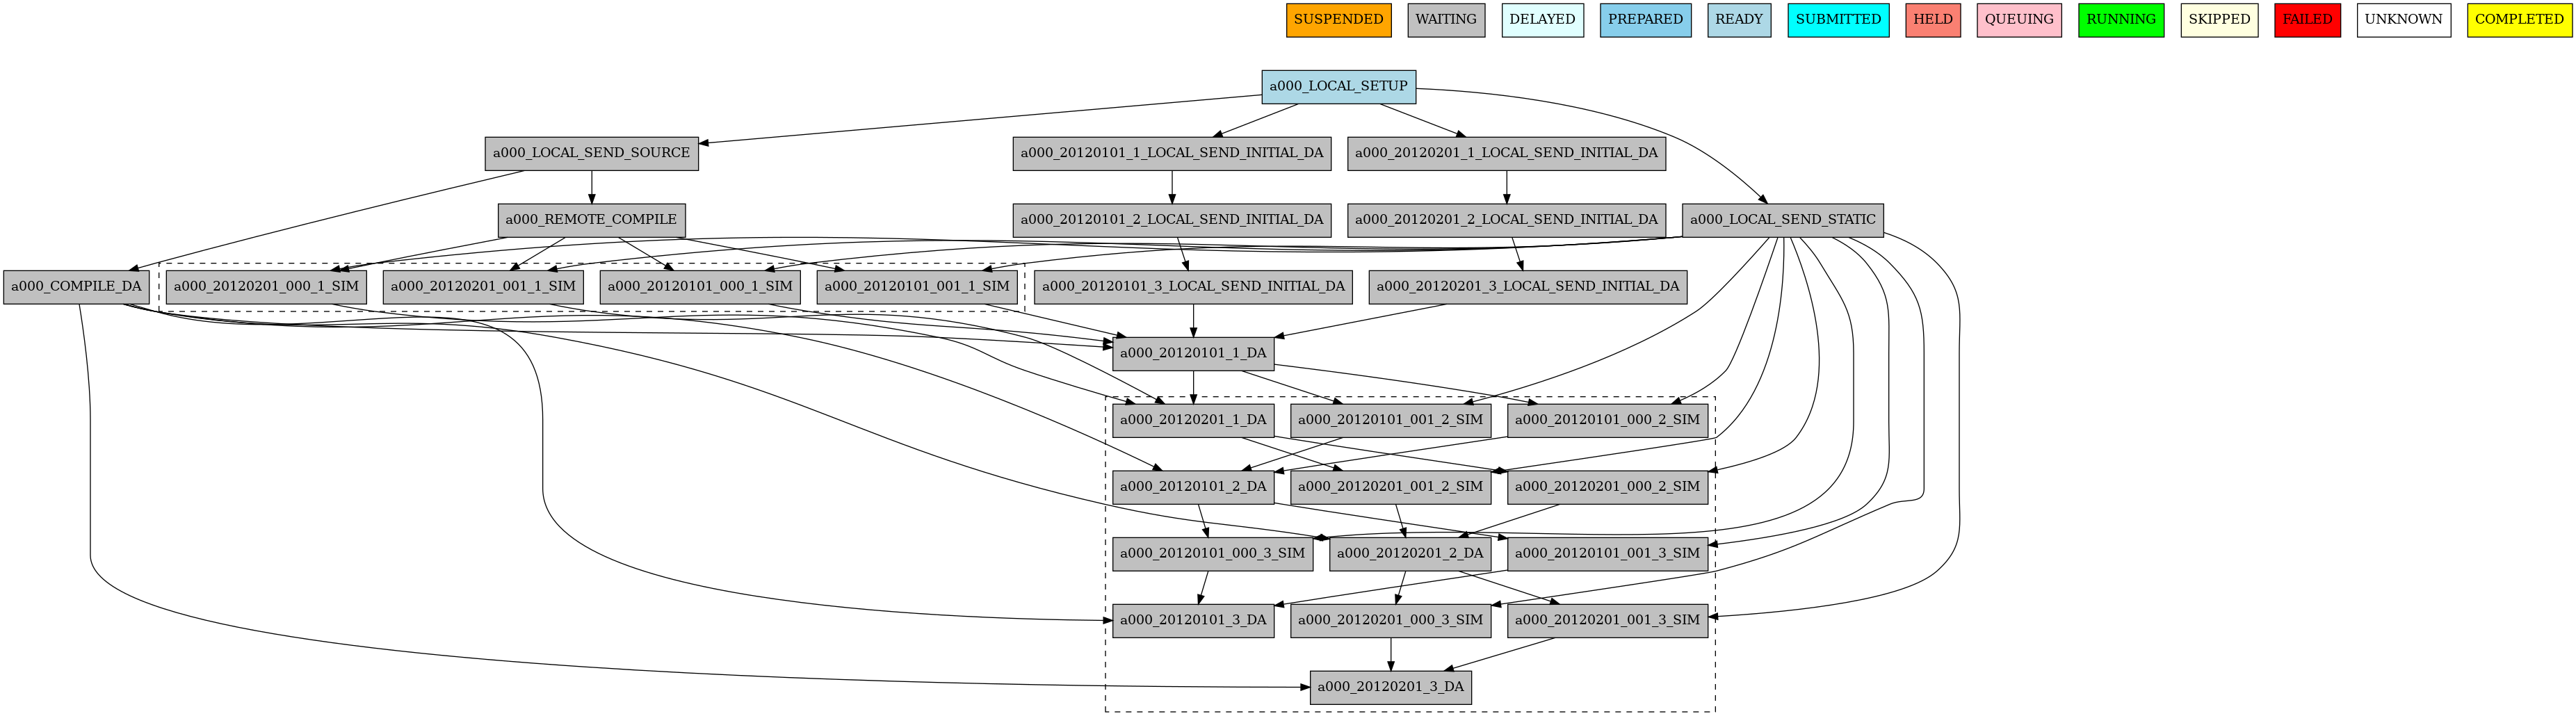
Finally, you can launch Autosubmit run in background and with nohup (continue running although the user who launched the process logs out).
# Add your key to ssh agent ( if encrypted )
ssh-add ~/.ssh/id_rsa
nohup autosubmit run <EXPID> &
How to stop the experiment#
From Autosubmit 4.1.6, you can stop an experiment using the command autosubmit stop
Options:
$ autosubmit stop -h

Output:
usage: autosubmit stop [-h] [-f] [-a] [-fa] [-y] [-c] [-fs FILTER_STATUS]
                       [-t STATUS]
                       [expid]

Completely stops an autosubmit run process

positional arguments:
  expid                 experiment identifiers separated by commas

optional arguments:
  -h, --help            show this help message and exit
  -f, --force           Forces to stop autosubmit process, equivalent to kill
                        -9
  -a, --all             Stop all current running autosubmit processes, will
                        ask for confirmation unless -y is used
  -fa, --force_all      Stop all current running autosubmit processes
  -y, --yes             Automatically answer yes to prompts
  -c, --cancel          Orders to the schedulers to stop active jobs.
  -fs FILTER_STATUS, --filter_status FILTER_STATUS
                        Select the status (one or more) to filter the list of
                        jobs.
  -t STATUS, --target STATUS
                        Final status of killed jobs. Default is FAILED.
Examples:#
autosubmit stop <EXPID>
autosubmit stop <EXPID>, <EXPID>
autosubmit stop -a
autosubmit stop -a -f
autosubmit stop -a -c
autosubmit stop -fa --cancel -fs "SUBMITTED, QUEUING, RUNNING" -t "FAILED"
You can stop Autosubmit by sending a signal to the process. To get the process identifier (PID) you can use the ps command on a shell interpreter/terminal.
ps -ef | grep autosubmit
dbeltran  22835     1  1 May04 ?        00:45:35 autosubmit run <EXPID>
dbeltran  25783     1  1 May04 ?        00:42:25 autosubmit run <EXPID>
To send a signal to a process you can use kill also on a terminal.
To stop immediately experiment <EXPID>:
kill -9 22835
Important
In case you want to restart the experiment, you must follow the How to restart the experiment procedure, explained below, in order to properly resynchronize all completed jobs.
Retries#
For remote platforms, there are at least two parts where retries happen (if you use wrappers you may have others), when Autosubmit connects to the remote platform, and when Autosubmit executes a command.
When Autosubmit connects to a remote platform, it will use the host
value of the platform configuration. This value can contain a single
host name, or a list of host names using commas (,) as separators.
Right now Autosubmit has a hard-coded number of retries for connecting
to remote platforms. It will try to connect to the platform, without
interval, retrying connecting twice (``2``). It will write to logs in
INFO and WARNING levels information about the retries, like
whether it is retrying to connect, and what is the current retry number.
When Autosubmit retries connecting to a platform with multiple hosts separated by comma, the first connection uses the first host name. If it retries the connection, the next executions will exclude the first host, and then randomly select one of the remaining host names.
For executing commands on remote platforms, Autosubmit uses another
hard-coded value of 3 retries, without interval between each retry.
Autosubmit will submit the command to be executed via SSH. If the command
fails on the remote platform, Autosubmit will not retry the command.
As an example, if you try to run an executable such as Rscript, but this
executable does not exist on the remote platform, Autosubmit will log the error,
and mark the job as FAILED.
However, if you have a networking issue between Autosubmit and your remote
platform, then Autosubmit will log in INFO and WARNING and will
retry executing the command up to hard-coded ``3`` retries.
Note
We already have an issue created to make these retry settings configurable by users and site admins.