Tutorial start guide
This tutorial is a starter’s guide to running a dummy experiment with Autosubmit.
Dummy experiments run workflows with non-expensive empty tasks and therefore are ideal for teaching and testing purposes.
Real experiments instead run workflows with complex tasks. To read information about how to develop parameterizable tasks for Autosubmit workflows, refer to Developing a project.
Pre-requisites
Autosubmit needs to establish password-less SSH connections in order to run and monitor workflows on remote platforms.
Ensure that you have a password-less connection to all platforms you want to use in your experiment. If you are unsure how to do this, please follow these instructions:
- Open a terminal and prompt
`ssh-keygen -t rsa -b 4096 -C "email@email.com" -m PEM` - Copy the resulting key to your platform of choice. Via SCP or ssh-copy-key.
Description of most used commands
| Command | Short description |
|---|---|
| expid | Creates a new experiment and generates a new entry in the database by giving it a serial id composed of 4 letters. In addition, it also creates the folder experiment and the basic folder structure. |
| create <expid> | Generates the experiment workflow. |
| run <expid> | Euns the experiment workflow. |
| monitor <expid> | Shows the experiment workflow structure and status. |
| inspect <expid> | Generates Autosubmit scripts and batch scripts for inspection, by processing the tasks’ templates with the experiment parameters. |
| refresh <expid> | Updates the project directory. |
| recovey <expid> | Recovers the experiment workflow obtaining the last run complete jobs. |
| setstatus <expid> | Sets one or multiple jobs status to a given value. |
Create a new experiment
autosubmit expid -dm -H "local" -d "Tutorial"
- -dm: Generates a dummy experiment.
- -H: Sets the principal experiment platform.
- -d: Sets a short description for the experiment.
The output of the command will show the expid of the experiment and generate the following directory structure:
| Experiment folder | Contains |
|---|---|
| conf | Experiment configuration files. |
| pkl | Workflow pkl files. |
| plot | Visualization output files |
| tmp | Logs, templates and misc files. |
| proj | User scripts and project code. (empty) |
Then, prompt autosubmit create <expid> -np and Autosubmit will generate the workflow graph.
Run and monitoring:
To run an experiment, use
`autosubmit run <expid>`. Autosubmit run experiments performing the following operations:
- First, it checks the experiment configuration. If it is wrong, it won’t proceed further.
- Second, it runs the experiment while retrieving all logs from completed or failed tasks as they run.
- Third, it manages all the workflow steps by following the dependencies defined by the user until all jobs are in COMPLETED or FAILED status. There can be jobs left in WAITING status if their dependencies are in FAILED status.
While the experiment is running, it can be visualized via autosubmit monitor <expid>.
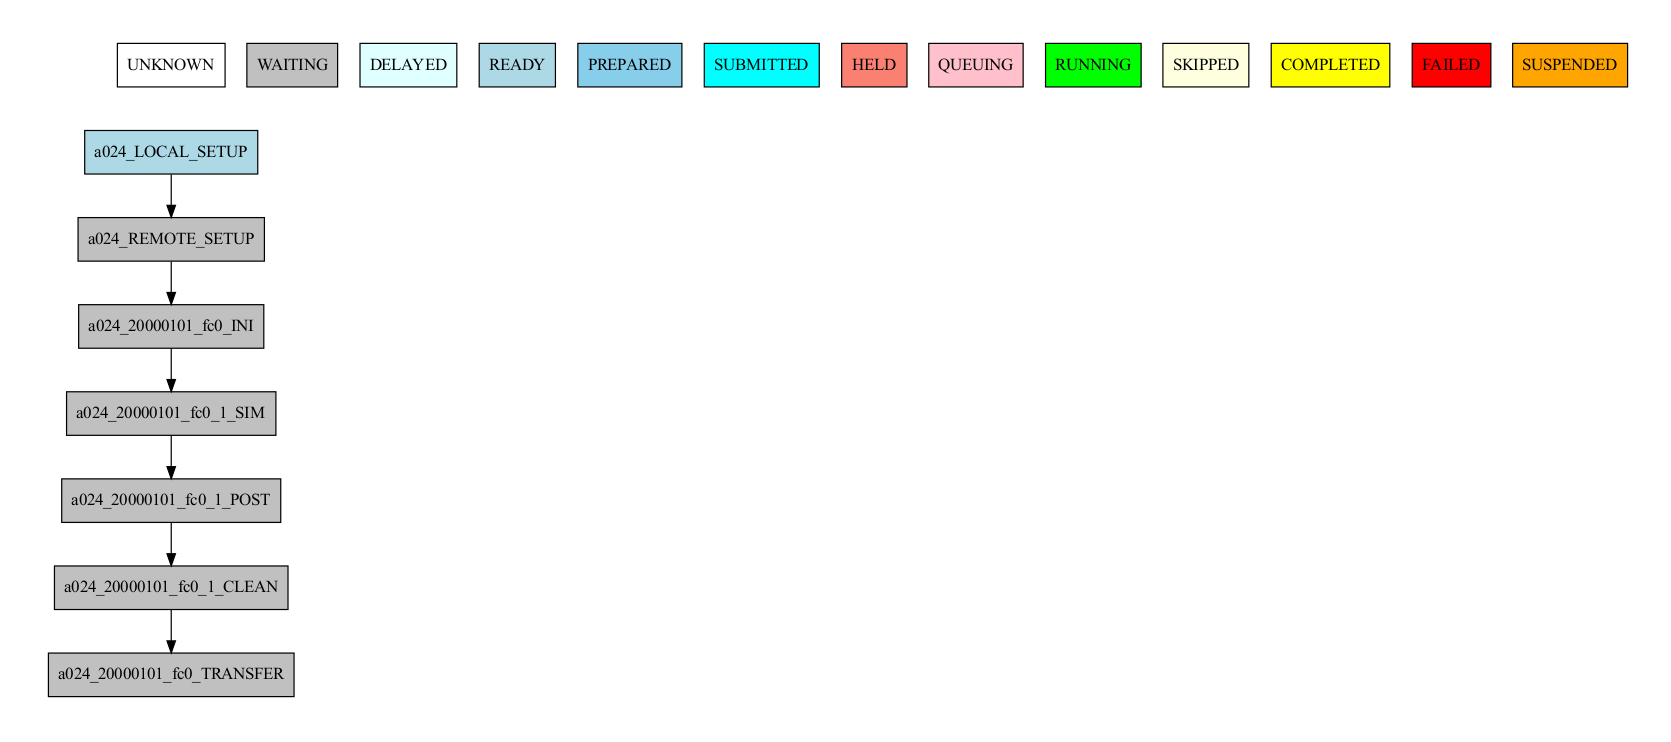
illustrates the output of the autosubmit monitor. It describes all workflow jobs’ possible status and actual status.
At the same time, the <expid>/tmp gets filled with the cmd scripts generated by Autosubmit to run the local and remote tasks (in this case, they are sent and submitted to the remote platform(s)).
On the other hand, the ASLOGS and LOG_a000 folders are filling up with AS command logs and jobs logs.
Configuration summary:
In the folder<expid>/confthere are different files that define the actual experiment configuration.
| File | Content |
|---|---|
expdef.conf |
|
platforms.conf |
|
jobs.conf |
|
autosubmit.conf |
|
proj.conf |
|
Final step: Modify and run
It is time to look into the configuration files of the dummy experiment and modify them with a remote platform to run a workflow with a few more chunks.
Open expdef.conf
[DEFAULT]
EXPID = a000 #<- don't change
HPCARCH = local # Change for your new main platform name, ej. marenostrum4

# Locate and  change these parameters, per ej. numchunks = 3
[experiment]
DATELIST = 20000101
MEMBERS = fc0
NUMCHUNKS = 1
(...)
Now open platforms.conf. Note: This will be an example for marenostrum4
[marenostrum4]
# Queue type. Options: ps, SGE, LSF, SLURM, PBS, eceaccess
TYPE = slurm # scheduler type
HOST = mn1.bsc.es,mn2.bsc.es,mn3.bsc.es
PROJECT = bsc32 # <- your project
USER = bsc32070 # <- your user
SCRATCH_DIR = /gpfs/scratch
ADD_PROJECT_TO_HOST = False
# use 72:00 if you are using a PRACE account, 48:00 for the bsc account
MAX_WALLCLOCK = 02:00
# use 19200 if you are using a PRACE account, 2400 for the bsc account
MAX_PROCESSORS = 2400
PROCESSORS_PER_NODE = 48
SERIAL_QUEUE = debug
QUEUE = debug
autosubmit create <expid>** (without -np) will generate the new workflow and autosubmit run <expid> will run the experiment with the latest changes.